Installing RTXI
Getting RTXI:
- Installation
- Install a generic Linux image, compile a Xenomai-patched kernel, and then install RTXI from source.
- Upgrade
- If you already use a previous version of RTXI, you can update your system without recompiling a kernel or reintstalling any of your OS.
1. Download a generic Linux installation image.
You can install RTXI on any Linux distribution you like. Keep in mind that the installation scripts we use work for Ubuntu and Debian. Your distribution may name or organize packages differently, so you'll have to account for that on your own. Below are download links for generic Ubuntu GNOME live CDs.
2. Burn the image to a DVD or a USB drive.
You can use whatever DVD burner is available on your operating system. If you want a live USB, you may need additional software. For different operating systems, check out:
- Linux
- Use Startup Disk Creator
- Windows
- Use LinuxLive USB Creator.
- MacOS
- Use UNetbootin.
3. Follow the built-in installer and install the operating system.
Boot into the live CD. When prompted, start the installation process. There are no special considerations to be made at this step. Installers are generally intuitive, but if you have issues, there is a plethora of information online for how to install various Linux distributions. You can find help for installing Ubuntu GNOME here.
When the installation is finished, reboot and log into your system. Be sure to remove the live media, or you might boot back into the live CD.
Note: You may have to edit your BIOS settings to let you boot from media other than your hard drive. When cold-booting your computer, hit the necessary keys, usually F2 or F4, and open the menu. From the menu, look for your boot options. There you can manually override the boot order of devices on your system. If you're booting from a DVD or USB, look for your DVD drive or USB label, respectively, and set them to be first in your boot order. Save you changes and exit your BIOS menu.
4. Clone the RTXI repository using git.
Open a terminal. You can use the applications menu or enter the CTRL+ALT+t shortcut. From the terminal, install the git package. Git is a version control system that can synchronize files over many machines. We use it for developing RTXI source code, which is hosted on GitHub.
$ sudo apt-get install gitOnce git is installed, use it to download the RTXI source code and access the source code for v3.0.0.
$ git clone https://github.com/rtxi/rtxi
$ cd rtxi
Tip: The above code will download the source files to wherever you are in your filesystem. If you are within your own user directory, then the source files will only be accessible to your account, not anyone else's. To download the source code in a central location that all users can access, consider:
$ git clone https://github.com/rtxi/rtxi
$ sudo mv rtxi /home/
$ cd /home
$ sudo find rtxi \( -type d -exec chmod u+rwx,g+rwx,o+rx {} \; -o -type f -exec chmod u+rw,g+rw,o+r {} \; \)
$ cd /home/rtxi/
Note: Don't do this if you have a user named "rtxi". Rename the RTXI folder you cloned to something else.
5. Install RTXI and real-time kernel dependencies.
Install the dependencies for RTXI and for installing the real-time (RT) kernel. Assuming you are in the cloned RTXI directory, run:
$ ./scripts/install_dependencies.shThe script will run for a while, updating your current packages and installing ones needed later.
6. Compile and install the real-time kernel.
From the same directory, run:
$ ./scripts/install_rt_kernel_evl.shThe script will download the sources for the Linux kernel and the Xenomai EVL library. Before the kernel starts compiling, you will be prompted to edit the kernel config flags. A UI will pop up that looks as follows:
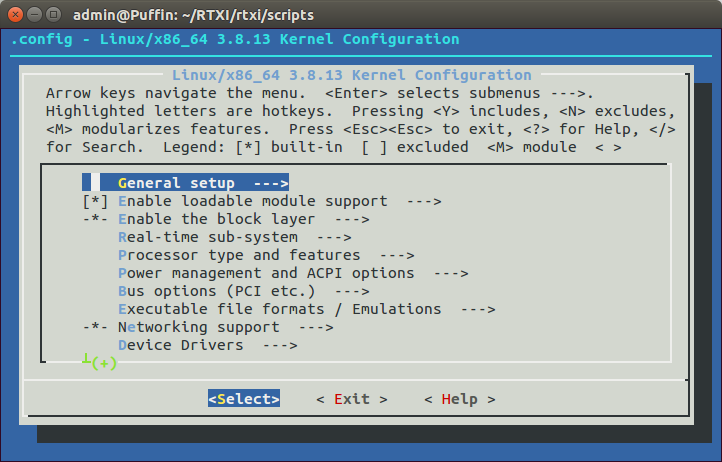
This is the config menu that allows you to edit what you want compiled into the kernel. For optimal performance, edit the following options:
Enable EVL
From the top menu, follow the path:--> Processor type and features--> EVL real-time core (enable)Hit
SPACEon all the drivers to have them built into the kernel. A "*" beside the field means that the drivers are set properly. Note that "M" means that the drivers will be built as kernel modules, not built into the kernel itself. "*" is the desired setting here, not "M".Hit
ESCto get back to the top menu from where you started. Be careful to not exit the configuration menu.Select your processor type.
From the top menu, follow the path:--> Processor type and features--> Processor familySelect the option that corresponds to your processor type. If unsure of what processor you have, open another terminal run:
$ cat /proc/cpuinfoThis will display the CPU information needed to correctly select your configuration. Most newish computers with Intel processors usually have an i3, i5, or i7. For them, select
Core 2/newer Xeon.Note: For 32-bit systems,
Enable -fstack-protector buffer overflow detectionshould also be disabledDisable power management options (Xenomai 3).
You need to disable some CPU scaling capabilities of the kernel that can otherwise interrupt the real-time framework. Note that this is not needed for evl version of xenomai. From the top menu, follow the path and disable:--> Power Management and ACPI options--> Suspend to RAM and standby (disable)--> Hibernation (disable)--> CPU frequency scaling--> CPU frequency scaling (disable)--> ACPI support--> processor (disable)--> CPU idle--> CPU idle PM support (disable)To disable drivers, move the cursor to the item and hit
SPACEuntil the field the left is blank.
Once all the flags have been set properly, exit to the top menu. Hit ESC again and choose install_rt_kernel_evl.sh script will compile the kernel and install it automatically. When the script terminates successfully, reboot the system.
From the boot menu, select the "Advanced" option from the GRUB bootloader to open up a submenu that lists all the available kernels. The real-time kernel will be named x.y.z-xenomai-4, where x.y.z is an automatically selected kernel version closes to the one already on the system. Select it and boot the system.
7. Install RTXI.
Install RTXI with the install_rtxi.sh script. Again from the root directory run:
$ ./script/install_rtxi.shGive your password when prompted. The script will also prompt you for an installation mode.
- evl
- Install RTXI so that it uses the real-time EVL kernel.
- xenomai
- Install RTXI so that it uses the real-time xenomai alchemy skin kernel. This is used for installing rtxi on existing xenomai installation that was used for rtxi 2.4 and older
- posix
- RTXI will not perform in real-time, but with this option, it can be installed this way on systems without a real-time kernel. This is used for trying out RTXI and testing purposes.
If you want real-time performance, enter "evl" to use Xenomai EVL and wait for RTXI to be installed. If upgrading from a previous version of rtxi and you wish to keep xenomai 3 installation, then enter xenomai. When the installation script terminates, RTXI is ready for you to use. To start RTXI, run:
$ sudo rtxi8. Install modules.
By default, a clean installation of RTXI only contains system modules. To use custom modules, you will need to download and install them separately. All RTXI modules are available on our GitHub repository. You can view all our modules and instructions for installing them on our modules page.
NOTE: Under the newest version of RTXI 3.0.0 some plugins may still be unavailable. Email rtxi support if there is a plugin you wish to use that is not available yet for RTXI 3.
Note: Current tested platforms are Ubuntu 20.04 and Ubuntu 22.04. RTXI is built with cross-platform support in mind so it should be possible to install in other linux distributions such as debian and fedora, but the available scripts for dependency and kernel isntallation do not work under non debian platforms. Check your distribution's package manager to install dependencies.
1. Clone the RTXI GitHub repository.
If you haven't already cloned our GitHub repo, run the following in the terminal.
$ git clone https://github.com/rtxi/rtxi.git
$ cd rtxi
If you already have a clone of the repository, go to it and run:
$ git pull origin master2. Install and/or update dependencies.
Run the install_dependencies.sh script to download dependencies. The script is maintained for Ubuntu 22.04. but it should work for Ubuntu 20.04. If you are For old operating systems, some of these packages may not exist, and if that's the case, we strongly encourage you to upgrade.
$ cd scripts/
$ ./install_dependencies.sh
3. Install RTXI 3.0.0.
Run the installation script, also in the scripts/ directory.
$ ./install_rtxi.shYou will be prompted to select a configuration: evl, xenomai, or posix. Soon, RTXI will be compiled and installed. When finished, you can run v3.0.0 with:
$ sudo rtxiNote: This will not work if you are running an RTAI-patched kernel. To compile RTXI v3.0.0 for RTAI kernels, see our relevant information on the FAQs section of the documentation page or the full documentation for configuration options.
4. Install modules.
All available core modules in v2.4 came packaged with RTXI. However, v3.0.0 introduced new plugin api, which requires migrating older custom plugins to the new architecture. If there is a plugin you wish to see migrated sooner, send an email to our help contact. for RTXI we moved to Qt5 and eliminated dependencies for a leaner development cycle and maintenance.
What this means for you is that at this point, you've installed RTXI v3.0.0, but you need to recompile your modules to use updated dependencies. If you are using the DefaultGUI framework, this will require a redisign of your plugin to use the new RTXI widgets framework.
All modules on the modules page are up-to-date for v3.0.0. See the following documentation on porting to old Qt code to Qt5.
Benchmark RTXI and the RT Kernel
The final step of any RTXI installation is to benchmark RTXI and the real-time kernel it uses. Tests center around the built-in xenomai latency test and the RT benchmarking module within RTXI. An explanation of what exactly the tests measure is available in our documentation.
Xenomai latency test
If you used the live CDs, run:
$ cd /opt/rtxi/scripts/
$ sudo ./test_rt_kernel.sh
If you did a custom installation, go to the base of the RTXI directory you cloned from GitHub and run:
$ cd scripts/
$ ./test_rt_kernel.sh
This script will test kernel latencies at rate of 20 kHz while under stress. The test lasts 10 minutes. If at any point you need to stop the test, you can kill the process by entering CTRL+c in the terminal running the stress test. Then, run pkill stress. If you forget to use pkill, the system will stop measuring latencies, but it will still be under stress. Depending on your system, you may experience lag in your desktop during the test. Keep in mind that the stress test is designed to assess real-time performance under worst-case conditions. If your system performs well under heavy load, you can be reassured that it will perform well during your experiments.
Once completed, the script will provide the data necessary for you to generate a latencies histogram for your system.
For systems with discrete graphics cards and somewhat recent processors, latencies should consistently remain on average below 2-3 μs. Worst case latencies may get as high as 10-15 μs, but keep in mind that these spikes occur often once or twice over the 10 minute duration of the stress test, which at 20 kHz constitutes 12 million cycles. Compare your performance to what is available on our stats and benchmarks page and let us know if your performance is problematic.
Record the RT benchmarks module
RT performance during experiments can be monitored and recorded through the RT Benchmarks module. Record the RT Benchmarks module in RTXI using the Data Recorder module. RT Benchmarks displays runtime statistics for your system, such as the computation time, real-time period, and jitter. For those unfamiliar with the terms, here are brief definitions:
- Computation Time
- The time it takes to compute all the real-time components running, including all modules, data streams, and timers. It should always be less than the real-time period. Otherwise is an overrun.
- Real-time Period
- The elapsed time for one complete real-time cycle, encompassing the computation time, scheduler, sleep time, etc. This number is set by choosing the frequency in the System Control Panel module. Pay attention to the peak real-time period. A period twice what the period should be constitutes an overrun.
- Real-time Jitter
- Jitter is the standard deviation of all the real-time periods, starting from when the module was opened or the reset button pressed and ending at the last completed real-time period.
To record the RT Benchmarks module:
- Open RTXI and open the Data Recorder and RT Benchmarks module from the System drop-down menu.
- In the Data Recorder, click "Choose File" and name the file you want data to be written to.
- In the Data Recorder, for "Block," choose "Performance Measurement." For "Type," choose "State." For "Channel", select "Comp Time" and hit "Add." Repeat for the "Real-time Period" and "RT Jitter" channels.
- Hit "Start Recording."
- When done recording, hit "Stop Recording."
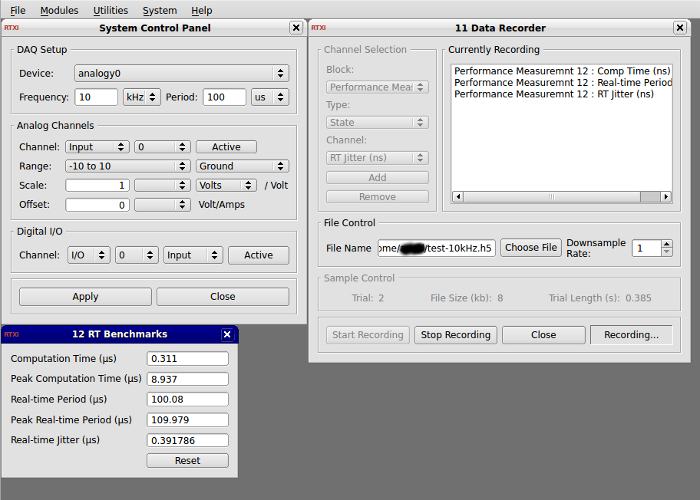
Note: You can change the frequency for your measurements via the System Control Panel. Just open the module, change the value for "Frequency," and hit "Apply" to save your changes.
Note: If you set the frequency high or record for a long time, the size of the generated files can become unwieldy. Make liberal use of the downsampling functionality in the Data Recorder.